Tea lovers, are you ready to take your tea game to the next level? Imagine the taste of fresh-picked tea leaves grown in your own backyard. Not only is it an incredible way to cut costs and have a steady supply of tea, but it's also a hobby that will bring you satisfaction and a sense of accomplishment.
Tea is one of the world’s most consumed beverages, and tea gardens are abundant in many tea-drinking countries, second only to water.
In this blog, we detail everything you need to know about planting a tea garden and harvesting your own tea leaves so you can make the best cup of tea at home. Let’s get started!
Table of Contents
The History of Tea
Tea originated in China nearly 4,000 years ago, traveled across Asia and Europe, and eventually found its way into the hearts and homes of people worldwide. Due to tea's enormous popularity, there are countless ways to make it.
While you may be familiar with tea leaves, did you know that tea plants are just as important? That’s right—tea plants and leaves play a vital role in the flavor and aroma of your cuppa. Tea leaves are harvested from tea plants. And while harvesting tea leaves may seem like an easy job, growing the plant requires careful planning and execution.
A Little Info About The Top Tea Variety
The tea plant, Camellia sinensis, is a small evergreen shrub that can grow up to 6 feet tall. Tea plants are native to Asia and prefer humid, tropical climates with well-drained soil and plenty of sunlight. If you live in an area with these conditions, then congratulations—you’re one step closer to being able to grow your own tea plant! (I don't live in those conditions, but I still enjoy tea). Even though other tea varieties are sold in supermarkets, most come from the “Tea Plant,” also known as Camellia Sinensis. Now let’s talk about how to get started.
Planting and Maintenance
To start growing your own tea garden, you'll need to select the right tea plant and variety for your area. Common varieties include black tea, green tea, oolong tea, and black oolong tea. One of the best ways to get started is by purchasing tea seeds online or from a local specialty shop. (Additional tea varieties are below)
Each tea plant has different characteristics and growing requirements, so research before selecting a tea plant for your garden. I grow my tea garden on a smaller scale and will detail my personal strategy in a section below.
#1 Choose the right location: Look for a spot that gets full sun, has well-draining soil, and has a pH between 6 and 7. (I personally use deck porch planters)
#2 Prepare the soil:
- Test the soil: You should test the soil to check the pH level, and if necessary, amend the soil with lime or sulfur to adjust the pH. Tea plants prefer slightly acidic soil with a pH between 6 and 7.
- Add Organic matter: Add organic matter such as compost to the soil to improve fertility. Organic matter will help improve the soil's structure, making it more porous and easier for the roots to penetrate.
- Work in fertilizer: Mix in a balanced fertilizer into the soil at a rate of about 1 cup per 10 square feet of soil.
- Create raised beds: Create raised beds if your soil is poorly drained. This will help to improve drainage and prevent waterlogging.
- Clear the area: Clear the area of any weeds or debris, and break up any large clumps of soil.
- Use Mulch: Once the soil is prepared, cover the soil with a layer of mulch to retain moisture and suppress weeds.
Preparing the soil properly ensures that your tea plants will have the best possible growing conditions.
#3 Sowing Seeds or Planting Seedlings: Follow the manufacturer's instructions to ensure that the plants are planted correctly, receive adequate water and sunlight.
Sowing Seeds:
- Fill a seed tray with a seed starter mixture
- Sow the tea seeds on the surface of the compost and cover them with a very fine layer of vermiculite or fine soil
- Cover the seed tray with a plastic dome or plastic bag to maintain moisture and warmth.
- Keep the seed tray in a bright, warm place, and moist.
- Once the seedlings are large enough to handle, transplant them into individual pots.
- When the seedlings are about 6 inches tall and have enough leaves, they can be planted in their final location.
Planting Seedlings:
- If you opt to purchase seedlings, make sure they are healthy and have a good root system.
- Dig holes in the prepared soil, large enough to accommodate the roots of the seedlings.
- Water the seedlings before planting; this will help to reduce transplant shock.
- Carefully plant the seedlings into the holes, ensuring the roots are well-covered with soil.
- Slightly press the soil around the seedlings and water well.
- Keep the soil consistently moist and fertilize the plants with a balanced fertilizer.
#4 Care for the plants:
- Watering: Tea plants require regular watering, especially during hot and dry weather. The soil should be consistently moist but not waterlogged. Overwatering can lead to root rot, while underwatering can cause the leaves to wilt and become discolored.
- Fertilization: Fertilize the plants with a balanced fertilizer, such as a 10-10-10 or 8-8-8, at regular intervals throughout the growing season. The fertilizer should be applied at a rate of about 1 cup per 10 square feet of soil.
- Pruning: Prune the plants regularly to promote bushier growth and remove dead or diseased leaves. This will help to keep the plants healthy and productive.
- Mulching: Use mulch to retain moisture and suppress weeds. This will help to keep the soil cool and moist and reduce the amount of water that is lost through evaporation.
#5 Monitor pests, diseases, and other potential issues: Keep an eye out for any pests or diseases, and address them promptly to maintain the health of your tea garden.
- Regularly inspect the plants: Check the plants regularly for any signs of pests, diseases or other issues. This can include discolored or wilted leaves or holes in the leaves, o
- Keep an eye out for common pests and diseases: Some common pests and diseases that can affect tea plants include tea mites, tea thrips, tea leaf miners, powdery mildew, and leaf spot. Knowing what to look for can help you to identify and address issues quickly.
- Take preventive measures: Some preventive measures that can help to keep pests and diseases at bay include proper watering, fertilization, and pruning, as well as using mulch and companion planting.
- Use pesticides if necessary: If pests or diseases are present, use pesticides or other control methods to eliminate them. Be sure to use the appropriate products and follow the instructions on the label. I often opt for an organic approach such as need oil.
- Keep records: Keep records of when you inspect your plants, what you find, and what actions you take. This will help you to identify patterns and trends and make adjustments to your care routine as needed.
#6 Harden Plants: After the plants have have grown to a transplant size, now it’s time to harden the plant off by taking it outdoors for a few hours each day to get used to the outdoor environment.
- Place in the shade of a modest tree or a substantial shrub in a protected and partially shaded area of the garden or patio.
- Young tea plants need to be protected from frost, so it's best to keep them inside a greenhouse or warm porch for the first two seasons.
- It takes three years for Camellia sinensis plants to reach maturity, but when the shrubs are about 1 meter tall, they should be resilient enough to last in winter.
How and When to Harvest

Winter months are typically a dormant season for tea plants. Therefore, the initial “flush” of tea shoots in early spring should show signs of fresh growth. Use your finger or thumb to gently pull the first two lime green leaves or the budding from each branch; this should not be difficult. This kind of regular harvesting promotes new growth and aids in developing a bushier plant. Then, a soothing cup of tea can be made from these fresh, apple-green tea leaves.
Begin harvesting tea leaves from the tea shrubs when they are at their peak of flavor and nutrition. This means harvesting leaves from mid-morning to mid-afternoon, avoiding the hottest part of the day, as this can influence tea leaves' taste and nutritional value.
To prepare your harvest area, make sure it is clean and free of any debris. You can use a bowl or pan to collect the leaves or a green tea strainer to pick them gently.
After harvesting, dry tea leaves properly to retain their flavor and aroma. It is important to let them dry completely before storing them in an air-tight container. The tea vine can be harvested numerous times during the spring to summer growing season, which provides plenty of opportunities to experiment with making your favorite tea.
Three types of tea are produced from the same species, Camellia sinensis: green tea, oolong tea, and black tea. The nature of the leaves assumed after being harvested accounts for their differences.
Tea Leaves Processing
Withering, curling, oxidizing, and drying are the four steps that make up the processing of tea leaves. However, the real process of producing tea entails numerous processes at each stage.
How to Dry Tea Leaves

When it comes to drying tea leaves, there are a number of options available. The most popular method is using a dehydrator. I personally use the COSORI food dehydrator and purchased it on Amazon. But if you don’t have access to one, you can also choose to dry the leaves using sunlight or a warm oven.
However, be sure to select the right drying method for your tea leaves, as not all methods are suitable for every type of tea. For example, green tea leaves should be dried using sunlight as that is the optimal way to preserve their green color and flavor. Similarly, black tea leaves should be dried in an oven as that is the best way to prevent them from becoming bitter.
Also, consider factors such as your environment's temperature and humidity levels when choosing the drying method. Select a temperature between 95 and 100 degrees Fahrenheit and a relative humidity level between 50 and 60 percent. In addition, monitor the leaves during the drying process to prevent over-drying or under-drying.
When storing dried tea leaves, it is essential to use an airtight container to prevent oxidation and other negative effects of exposure to air. By following these steps, you can ensure that your tea leaves retain their flavor and aroma even after being dried.
My Personal Tea Garden
I do not grow the traditional tea plant mainly because of my growing zone (zone 5b); however, I grow chamomile, peppermint, orange mint, strawberry mint, lavender, lemon balm (my favorite), echinacea, stevia, and oregano. I decided to use deck porch planter boxes because it's near the kitchen and easily accessible. We are also beekeepers, and our bees love our tea garden. 7 Ways To Attract Amazing Pollinators To Your Garden
11 Additional Tea Varieties You Should Consider Growing
1. Chamomile

Although chamomile is most recognized for its relaxing properties, the tiny blossom flower can also stimulate the appetite and treat gastrointestinal discomfort. German and Roman chamomile are the two most common types. While Roman chamomile is a good ground cover, German chamomile is better suited for small gardens or pots.
Plant chamomile seeds outdoors or indoors. When mature seeds are left to fall off, chamomile develops easily. Plants thrive in a sunny location with fertile, well-drained, acidic soil. Even though chamomile may grow almost anywhere, it cannot stand temperatures above 98 degrees for long.
When branches contain multiple open blooms, cut them off and hang them to dry in bouquets. Remove the petals and store them in a sealed container after the stems have dried. Two tablespoons of dried flowers should be steeped for five to ten minutes in one boiling water cup to make tea
2. Mint
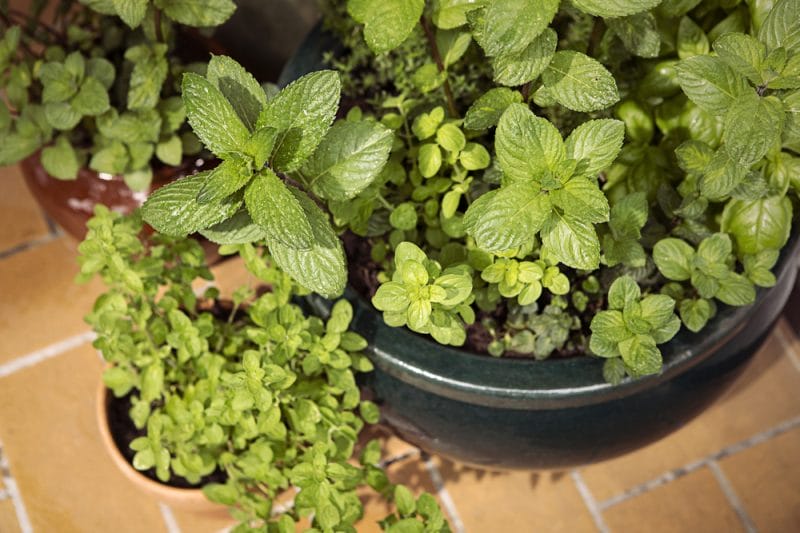
Mint is a resilient plant that requires little maintenance. It may flourish in normal soil with either partial or full light. Start seedlings indoors and transplant them outside after the last frost, or root new stem-tip cuttings by putting them in acidic soil. Planting mint close to a barrier, like a sidewalk, or growing it in a container will prevent it from spreading too much.
Pick leaves frequently to encourage development and maintain the plant's bushy leaves. Although mint could be dried, fresh mint is preferable. Depending on your desire, collect fresh leaves, lightly rip them, and immerse them for 3 to 7 minutes in boiling water.
3. Lemon Balm

For generations, people have appreciated lemon balm because of its calming effects. Additionally, it can help decrease blood pressure and ease headaches. From a cluster of roots, lemon balm could be grown, and early autumn to early summer is the optimal time to transplant it. Late in the winter, start seedlings safely indoors, then plant them outside in the spring. Lemon Balm is my absolute favorite!
Although lemon balm generally grows easily, it has the propensity to spread. (It’s part of the mint family) Grow this plant in a pot to stop it from spreading, or trim back blooming stems in the late summer. Lemon balm thrives in full light, rich, well-drained soil. Its stems are best taken while the blossoms are just starting to bloom. Soak a few leaf extracts in hot water between two and five minutes.
4. Lavender
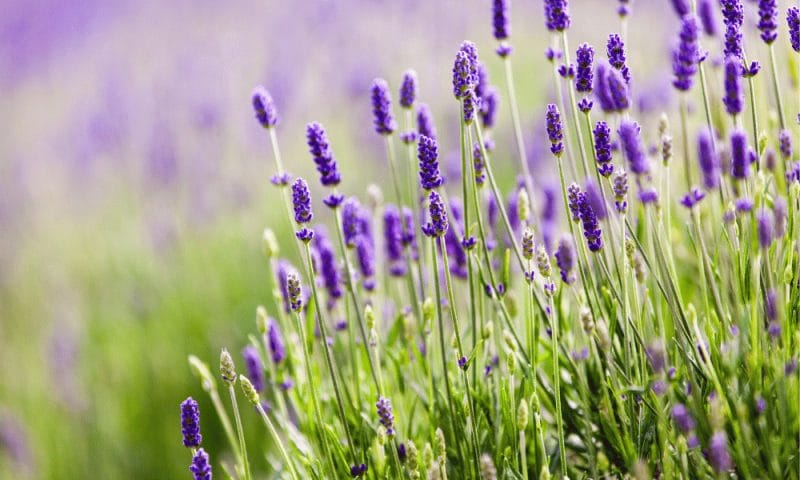
Lavender grows stunning purple flowers that not only have a fantastic aroma and flavor but also lessen headaches and guard against fainting and vertigo. Lavender prefers sunny, open settings with very well-drained, nearly sandy soil. Although it can thrive in pots or containers, a garden will allow it to grow taller and with greater airflow, which will help prevent fungus.
Plant seeds in the late summer or the early fall, or divide up existing clumps and plant them in the fall. Lavender stalks should be cut just as the flowers begin to bloom, dried in little bundles, and then kept in a sealed container. To make tea, four tablespoons of dried flowers should be steeped in boiling water between two and five minutes.
5. Echinacea

Due to its antiviral and antibacterial qualities, echinacea is excellent for preventing colds and sore throats. The entire echinacea plant (from the lavender coneflowers to its roots) can be utilized in tinctures and teas. Start with a nursery-bought plant, or start seeds inside in the late winter. Echinacea is tough and can weather harsh winters, but it won't dependably bloom until its second year. In colder regions, full sun is preferred; in hotter regions, moderate shade is preferred. Rich soil with a pH of neutral is ideal for echinacea growth.
It is possible to clean, trim, and dry roots. Cut stems above the bottom row of leaves, then hang them inverted to dry. One tablespoon of dried root or branches and flowers should be steeped in one boiling cup of water over three minutes to make echinacea tea.
6. Hibiscus

Hibiscus tea does have a deep red hue and a sharp flavor. When making hibiscus tea, just like with many other herbal teas, you are brewing the flower. It can significantly lower blood pressure, according to studies. It is widely used for sore throats, fevers, cramping, and stomach aches. It has a lot of vitamin C, which might support your body's immune system.
7. Stevia
Stevia is a well-liked substitute for table sugar or other sweeteners and tastes great in tea. It thrives in ordinary, well-drained soil with either midday shade or full sun. Start with a pre-purchased plant since stevia seeds are slow to grow. To encourage bushy leaves and postpone blossoming, pinch back frequently. Collect sprigs and make new tea in boiling water according to your preferred strength. Before midsummer plant blooms, collect stems to dry.
8. White Tea
The amount of processing done to white tea between harvesting and consumption is often little. Snip newly produced leaves from the ends of your tea plant's branches, and let them air out in the shade for a few days to prepare white tea. For the moisture to dissipate and prevent mold growth, make sure to give them plenty of room and avoid piling them together.
9. Green Tea
A freshly brewed glass of green tea is frequently what people envision when they think of hot tea. Because it may be drunk the same day as it is grown, green tea is particularly practical. Leaf extract from your coffee plant should be cut and allowed to air dry for around seven hours before making green tea. Now roll the leaves after quickly heating them in a frying pan. You may now steep and make your tea!
10. Oolong Tea
The leaves need to initially wilt for a few days before being used to make oolong tea. The leaves should then be shaken repeatedly, with a gap of roughly 30 minutes after each shaking, to allow for oxidation. The leaves are now set to be rolled after this procedure.
11. Black Tea

Black tea necessitates experimentation. The length of time the leaves need to wilt after harvest will depend on your environment and the type of tea shrub you have. Black tea requires greater pressure while rolling the leaves than other tea varieties. When juice begins to emerge from the leaves, you've correctly rolled your leaves.
Before consuming or storing black tea, the next step is to let the leaves rest in a warm environment until they take on that rich, warm reddish-brown hue that only black tea leaves can. Again, the time required can vary significantly depending on your plant family and the climate you're working in; occasionally, only a few hours or perhaps a half-day is required. You will need to experiment and keep a close eye on the process to figure out how to make the most remarkable cup of tea.
Tea Growing Kits
You can buy tea garden kits from many places if you wish to take a portion of the risk out of producing tea from seed. These kits include tea seeds, grow pellets, and detailed instructions to ensure effective germination and growth.
Shop for Tea Garden Seeds
When choosing the best tea seeds for your garden, it is important to consider the variety and climate in which you live. For example, tea plants require a specific type of soil and exposure to sunlight to thrive. Also, choose seeds best suited to your local climate and have a long history of producing high-quality tea leaves. Additionally, purchase seeds from a reputable vendor to ensure the quality of your tea plants. Finally, be patient, as planting and caring for tea plants can be challenging. However, with patience and care, you can successfully grow a beautiful tea garden of your very own!
The Top Ten Tea Facts
- In a sense, it is not tea if it is not made from the plant Camellia sinensis. Nowadays, many products sold as tea are combinations of flowers and herbs or, to be more precise, herbal infusions.
- Even though there are almost 2,000 different kinds of tea, what makes them different isn't the plant itself but rather how, where, and what occurs to it once the leaves are harvested.
- Tea is frequently processed to change and develop new flavors. Spraying with oil, smoking, and putting flowers in the mixture are all common remedies.
- It's believed that the drink was accidentally made when an Emperor in China allowed some tea leaves to stay in a saucepan of boiling water. That happened more than 2,000 years ago!
- The average British consumes 23 times as much tea as an Italian.
- Tea accounts for 40% of all fluids consumed daily in Britain.
- Following a five-year trial, it was discovered that participants who drank 375ml of black tea daily had a 43% lower chance of having heart disease and a 70% lower risk of suffering a stroke or heart attack.
- Americans enjoy drinking tea every day, consuming 165 million cups each day.
- India, Sri Lanka, Korea, Japan, China, Taiwan, and Africa are the primary tea-growing countries in the world.
- Climatologists predict that the Scottish Highland will one day be the best region to cultivate and produce tea due to climate change.
How To Brew The Perfect Cup Of Tea: Step-By-Step

- Start by heating fresh, cold water to the appropriate temperature for the type of tea you are brewing. Black teas should be brewed with water that has just come to a boil, while green, white and oolong teas should be brewed with water that is slightly cooler, around 170-185°F.
- Measure the appropriate amount of loose tea or tea leaves for the number of cups you are brewing. A general guideline is to use 1 teaspoon of loose tea or 1 tea bag for every 8 oz of water.
- Place the tea leaves or tea bag into your cup or teapot and pour the heated water over them.
- Steep the tea for the appropriate amount of time. Black teas should steep for 3-5 minutes, green teas for 2-3 minutes, white teas for 2-4 minutes, and oolong teas for 3-5 minutes.
- Remove the tea leaves or tea bag and enjoy your perfect cup of tea.
- You can also add honey, lemon, or milk, as per your preference.
Note: It's always recommended to use filtered or spring water for tea brewing, as the impurities in tap water can affect the taste of tea. And also the best practice is to use a thermometer to check the temperature of the water, especially when brewing green and white teas, as brewing them with water that is too hot can make them bitter.
Frequently Asked Questions
Where should I put my tea gardens, and how should they be arranged?
When it comes to growing your own tea garden, location is key. You'll want to choose a spot with plenty of sunlight and good soil drainage to ensure the plants can flourish. Additionally, ensure adequate space between each tea plant so they all have enough room to grow and thrive.
Be sure also to consider the local climate when deciding what tea plants to use for your garden. Different varieties of tea plants may do best in different environments, so be sure to research which type would work best for your area. Finally, arrange your backyard tea garden in neat rows or clusters for easier harvesting. This way, you can easily maintain the health of each plant while ensuring maximum yields come harvesting season.
Is it hard to maintain a tea garden?
Maintaining a tea garden is not hard, but it does require time and effort. First, you need to select the right tea plant for your climate and soil conditions. Additionally, you will want to ensure that the tea garden has well-drained soil and is regularly fertilized. Pruning your tea plants is also important to keep them healthy and productive. Finally, you will need to monitor your tea garden for pests and diseases and use natural remedies whenever possible. All these steps together will help ensure that your tea garden flourishes.
What are the benefits of growing your own tea garden?
Growing your own tea garden has many benefits. It can provide you with a fresh and organic source of tea, allowing you to customize the flavor of your tea by controlling the temperature, soil, and harvesting methods.
Planting a tea garden is also a fun and rewarding hobby that can help you relax and connect with nature. Not only that, but homegrown tea also has many health benefits, including reduced stress and improved digestion. Growing tea in your own garden means you'll have access to tea at all times without worrying about running out or paying for expensive tea bags!
Grow tea plants in containers or in the ground?
Growing tea plants in either container or in the ground is a great way to enjoy the flavor of fresh, homemade tea. Growing tea plants in containers is ideal for those with limited space and can be done indoors or outdoors. Containers should be large enough to accommodate the root system of the plant and should have drainage holes.
When growing tea plants in the ground, it's important to make sure they are planted in an area that has well-draining soil and plenty of sunlight. The soil should also be kept moist but not overly wet. Both container and ground-grown tea plants require regular pruning and fertilization to ensure healthy growth and production of flavorful leaves. With proper care, both methods can produce delicious home-grown tea leaves for your enjoyment!
Conclusion: The Ultimate Guide to Growing Your Own Tea Garden
Growing your own tea garden is a rewarding and enjoyable experience. Following the step-by-step guide outlined in this article, you can successfully cultivate your own tea plants and enjoy the freshest and most flavorful tea possible. From selecting the right tea seeds to properly planting, caring for, and harvesting your tea leaves, this guide provides all the information you need to grow your own tea garden and enjoy the fruits of your labor. Whether you're a seasoned gardener or just starting out, this guide is the perfect resource for anyone looking to grow and enjoy their own tea garden. You can also purchase a guide on How to grow a tea garden from Amazon here and start your gardening journey.
Want more: How To Choose and Grow The Best Herbs